Hướng Dẫn Xây Dựng Hệ Thống Machine Learning Hiệu Quả
Hệ thống Machine Learning (ML systems) là một ý tưởng cực kỳ giá trị — bởi nhiều người học ML nhưng lại thiếu kiến thức về cách xây dựng, triển khai và vận hành một hệ thống ML hoàn chỉnh ngoài thực tế.
Cuốn sách này sẽ hướng dẫn người đọc hiểu thế nào để truyển khai một hệ thống Machine Learning hoàn chỉnh từ cơ bản đến nâng cao
Tác giả: Đỗ Ngoc Tú
Công Ty Phần Mềm VHTSoft
Giới Thiệu
Trong kỷ nguyên dữ liệu hiện đại, các mô hình Machine Learning không chỉ tồn tại trong phòng thí nghiệm hay notebook Jupyter — chúng đang vận hành trong thế giới thực, đưa ra quyết định hàng ngày cho hàng triệu người dùng. Tuy nhiên, giữa một mô hình đạt độ chính xác ấn tượng trong quá trình huấn luyện và một hệ thống ML đáng tin cậy trong sản xuất là một hành trình dài, phức tạp và thường bị bỏ quên.
Cuốn sách này được viết ra để thu hẹp khoảng cách đó.
Mục tiêu của sách
Mục tiêu của cuốn sách không chỉ là giúp bạn hiểu cách xây dựng mô hình ML, mà còn hướng dẫn bạn xây dựng một hệ thống Machine Learning hoàn chỉnh – từ thu thập dữ liệu, huấn luyện mô hình, triển khai (deployment), đến giám sát và duy trì mô hình trong môi trường sản xuất.
Bạn sẽ học được gì?
-
Cách thiết kế pipeline xử lý dữ liệu hiệu quả và linh hoạt
-
Quy trình huấn luyện, kiểm thử và đánh giá mô hình một cách có hệ thống
-
Cách triển khai mô hình: từ API đơn giản đến mô hình quy mô lớn
-
MLOps: quản lý mô hình, dữ liệu và thực nghiệm như thế nào
-
Cách giám sát và kiểm tra độ ổn định của mô hình sau khi đưa vào sản xuất
-
Các công cụ phổ biến: Metaflow, MLflow, Airflow, Docker, Evidently AI, FastAPI, v.v.
Đối tượng độc giả
Cuốn sách này dành cho:
-
Các kỹ sư phần mềm muốn tìm hiểu cách xây dựng hệ thống ML thực tế
-
Các data scientist đã quen với mô hình nhưng muốn hiểu thêm về hệ thống
-
Những ai đang làm việc với ML trong doanh nghiệp và muốn nâng cao năng lực triển khai
Phương pháp tiếp cận
Cuốn sách sẽ đi theo phương pháp thực chiến – dựa trên ví dụ thực tế, từng bước xây dựng một hệ thống ML từ đầu đến khi vận hành sản phẩm. Với cách tiếp cận này, bạn không chỉ nắm lý thuyết mà còn có thể ứng dụng được ngay vào công việc.
Tác giả: Đỗ Ngọc Tú
Công Ty Phần Mềm VHTSoft
Giới thiệu Metaflow, Evidently AI và Keras
I. Metaflow – Orchestrating ML Workflows Made Simple
Metaflow là một framework mạnh mẽ được phát triển bởi Netflix, giúp đơn giản hóa quá trình xây dựng và quản lý pipeline machine learning. Với cú pháp thân thiện, khả năng tích hợp tốt với AWS, Kubernetes, và versioning rõ ràng cho cả dữ liệu và mô hình, Metaflow là công cụ lý tưởng để tổ chức, theo dõi và tái sử dụng các bước trong quy trình ML một cách dễ dàng và có hệ thống.
Trong các project của cuốn sách này, Metaflow sẽ đóng vai trò là xương sống của hệ thống ML pipeline, giúp bạn cấu trúc các bước như thu thập dữ liệu, huấn luyện mô hình, đánh giá và triển khai — tất cả trong một luồng rõ ràng và có thể mở rộng.
Metaflow giúp được gì
-
Thiết kế pipeline dễ dàng: Viết code ML theo cách tự nhiên nhất bằng Python.
-
Quản lý trạng thái (state): Tự động lưu trữ đầu ra của từng bước, giúp bạn dễ dàng resume hoặc debug.
-
Phiên bản hóa dữ liệu & mô hình: Hỗ trợ versioning đầu vào, đầu ra, mô hình, và code.
-
Tích hợp cloud dễ dàng: Hỗ trợ AWS (S3, Step Functions, Batch...) và có thể mở rộng cho các nền tảng khác.
-
Chạy song song & phân tán: Dễ dàng chạy các bước tốn tài nguyên theo kiểu phân tán hoặc song song.
Cách hoạt động
Bạn định nghĩa các bước trong pipeline bằng cú pháp Python rất thân thiện. Ví dụ:
from metaflow import FlowSpec, step

class HelloFlow(FlowSpec):

    @step
    def start(self):
        print("Hello from Metaflow!")
        self.next(self.end)

    @step
    def end(self):
        print("Flow finished.")

if __name__ == '__main__':
    HelloFlow()
Chạy bằng dòng lệnh:
python hello_flow.py runTính năng nổi bật
| Tính năng | Mô tả ngắn |
|---|---|
@step decorator |
Xác định các bước trong pipeline. |
| FlowSpec | Khai báo cấu trúc của flow. |
self.next() |
Xác định bước tiếp theo trong luồng xử lý. |
metaflow run |
Chạy pipeline. |
metaflow resume |
Tiếp tục pipeline từ bước bị lỗi. |
| Tích hợp MLFlow, Argo | Có thể tích hợp thêm các hệ thống orchestration. |
II. Evidently AI
Evidently AI là một thư viện mã nguồn mở giúp theo dõi hiệu suất của mô hình machine learning trong môi trường sản xuất. Nó cung cấp các báo cáo trực quan về drift dữ liệu, độ lệch phân phối đầu vào/đầu ra, độ chính xác, và nhiều chỉ số quan trọng khác mà bạn cần để đảm bảo mô hình hoạt động ổn định theo thời gian.
Trong các project của sách, Evidently AI sẽ được sử dụng để thiết lập các bước kiểm tra và giám sát mô hình, giúp bạn nhanh chóng phát hiện và xử lý các vấn đề như concept drift, data quality issues, và sai lệch hiệu suất trong môi trường thực tế.
Được thiết kế để hoạt động trước, trong, và sau khi triển khai mô hình ML.
Evidently AI làm được gì?
| Tính năng | Mô tả |
|---|---|
| Data Drift Detection | Phát hiện khi dữ liệu đầu vào thay đổi so với training data. |
| Model Performance Monitoring | Theo dõi accuracy, precision, recall,... theo thời gian. |
| Data Quality Checks | Kiểm tra sự thiếu hụt, phân bố, outliers,... trong dữ liệu. |
| Tạo báo cáo HTML trực quan | Tạo dashboard HTML dễ hiểu, chia sẻ dễ dàng cho đội ngũ. |
| Tích hợp dễ dàng | Chạy tốt cùng với Pandas, Jupyter, Airflow, MLflow, v.v. |
Một số use-case phổ biến
-
Kiểm tra dữ liệu đầu vào có giống training data không.
-
Kiểm tra mô hình có bị concept drift không.
-
Theo dõi mô hình trong môi trường sản xuất.
-
Tạo báo cáo ML định kỳ cho business/stakeholder.
Ví dụ dùng trong Jupyter Notebook
import pandas as pd
from evidently.report import Report
from evidently.metric_preset import DataDriftPreset

# Giả sử bạn có training data và current data
train_df = pd.read_csv("train.csv")
current_df = pd.read_csv("current.csv")

report = Report(metrics=[
    DataDriftPreset()
])

report.run(reference_data=train_df, current_data=current_df)
report.show(mode="inline")  # hiển thị trong Jupyter
report.save_html("data_drift_report.html")  # xuất báo cáo
Cài đặt
pip install evidentlyEvidently rất hữu ích nếu bạn là...
-
Data Scientist cần đảm bảo mô hình hoạt động tốt ngoài thực tế.
-
MLOps Engineer cần hệ thống giám sát tự động hóa.
-
Business Analyst muốn hiểu mô hình bằng các biểu đồ dễ hiểu.
Tích hợp với các công cụ khác
-
Jupyter Notebook – để khám phá dữ liệu.
-
Airflow – để lập lịch giám sát định kỳ.
-
MLflow, Metaflow, Dagster – để theo dõi toàn bộ pipeline.
-
Grafana / Prometheus – để push metric production theo thời gian thực (với Evidently Service).
II. Keras và Backend
-
Keras là một thư viện high-level API (giao diện cấp cao) được sử dụng để xây dựng và huấn luyện các mô hình học sâu (deep learning). Keras được thiết kế để dễ sử dụng và đơn giản hóa quy trình phát triển mô hình.
-
Keras có thể hoạt động trên nhiều backend khác nhau (phần cốt lõi chịu trách nhiệm tính toán số học và tối ưu hóa mô hình), và hiện tại hỗ trợ ba backend chính:
-
TensorFlow (là backend mặc định)
-
Theano (được hỗ trợ trước đây nhưng đã ngừng phát triển)
-
CNTK (Microsoft Cognitive Toolkit)
-
JAX (từ Google)
-
Vì sao chọn JAX làm backend?
JAX là một thư viện từ Google cho tính toán khoa học, nổi bật với các tính năng:
-
Tính toán tự động đạo hàm (autograd).
-
Tính toán song song và phân tán với GPU/TPU.
-
Vectorization – thực hiện tính toán trên nhiều phần tử cùng lúc.
-
Hỗ trợ tối ưu hóa và gradient-based learning cực kỳ mạnh mẽ.
Khi bạn đặt KERAS_BACKEND=jax, bạn yêu cầu Keras sử dụng JAX để thực hiện các phép toán, thay vì TensorFlow
Cách thức hoạt động với JAX
Khi sử dụng JAX làm backend cho Keras, bạn sẽ được hưởng các ưu điểm nổi bật của JAX, như:
-
Hiệu suất cao hơn, đặc biệt với việc chạy trên TPU/GPU.
-
Tự động đạo hàm (autograd) mạnh mẽ, cho phép tính toán gradient một cách hiệu quả và linh hoạt.
-
Tối ưu hóa gradient cho các mô hình học sâu, rất hữu ích khi huấn luyện các mô hình phức tạp.
Cài đặt JAX và Keras với JAX backend
Để sử dụng JAX làm backend cho Keras, bạn cần cài đặt các thư viện cần thiết:
1. Cài đặt Keras Core và JAX:
pip install keras-core jax jaxlib2. Sau đó, đặt biến môi trường KERAS_BACKEND thành jax:
export KERAS_BACKEND=jaxBây giờ Keras sẽ sử dụng JAX làm backend khi bạn xây dựng và huấn luyện mô hình.
Ví dụ
Ví dụ, nếu bạn muốn sử dụng Keras với JAX làm backend, bạn có thể tạo mô hình như sau:
from keras import layers, models
from keras.datasets import mnist

# Tải dữ liệu MNIST
(x_train, y_train), (x_test, y_test) = mnist.load_data()

# Chuẩn bị dữ liệu
x_train, x_test = x_train / 255.0, x_test / 255.0

# Xây dựng mô hình
model = models.Sequential([
    layers.Flatten(input_shape=(28, 28)),
    layers.Dense(128, activation='relu'),
    layers.Dropout(0.2),
    layers.Dense(10)
])

# Biên dịch và huấn luyện
model.compile(optimizer='adam', loss=tf.keras.losses.SparseCategoricalCrossentropy(from_logits=True), metrics=['accuracy'])
model.fit(x_train, y_train, epochs=5)
Tác giả: Đỗ Ngọc Tú
Công Ty Phần Mềm VHTSoft
Cơ bản về MLFlow
Bài thực hành cơ bản nhất
Dưới đây là một bài thực hành MLflow cơ bản nhất, cùng với hướng dẫn cách xem giao diện MLflow UI.
Mục tiêu:
-
Hiểu cách ghi lại (log) các tham số, metric và mô hình bằng MLflow.
-
Chạy MLflow UI để xem kết quả trực quan.
I. Cài đặt MLflow
python3 -m venv venv
source venv/bin/activate

pip install mlflow scikit-learn pandas
II. Tạo file mlflow_basic.py
# mlflow_basic.py

import mlflow
import mlflow.sklearn
from sklearn.ensemble import RandomForestRegressor
from sklearn.metrics import mean_squared_error
from sklearn.datasets import load_diabetes
from sklearn.model_selection import train_test_split
import pandas as pd

# Load dataset
data = load_diabetes()
X = pd.DataFrame(data.data, columns=data.feature_names)
y = pd.Series(data.target)

# Train-test split
X_train, X_test, y_train, y_test = train_test_split(X, y, test_size=0.2, random_state=42)

# Bắt đầu một MLflow run
with mlflow.start_run():

    # Tham số mô hình
    n_estimators = 100
    max_depth = 4

    # Log parameters
    mlflow.log_param("n_estimators", n_estimators)
    mlflow.log_param("max_depth", max_depth)

    # Train model
    model = RandomForestRegressor(n_estimators=n_estimators, max_depth=max_depth)
    model.fit(X_train, y_train)

    # Predict & evaluate
    predictions = model.predict(X_test)
    rmse = mean_squared_error(y_test, predictions, squared=False)

    # Log metrics
    mlflow.log_metric("rmse", rmse)

    # Log mô hình
    mlflow.sklearn.log_model(model, "model")

    print(f"Done! RMSE: {rmse}")
III. Chạy file
python mlflow_basic.pywarnings.warn( 2025/04/23 00:10:40 WARNING mlflow.models.model: Model logged without a signature and input example. Please setinput_exampleparameter when logging the model to auto infer the model signature.
Cập nhật đoạn log_model() như sau:
import numpy as np

# Log mô hình kèm input_example
mlflow.sklearn.log_model(
    model,
    artifact_path="model",
    input_example=X_test.iloc[:5],  # hoặc: X_test[:1]
    signature=mlflow.models.infer_signature(X_test, predictions)
)
Giải thích:
-
input_example: Một ví dụ dữ liệu đầu vào cho mô hình. MLflow dùng nó để minh họa cách input phải như thế nào. -
signature: MLflow sẽ tự động suy luận kiểu input/output của mô hình.
IV. Xem giao diện MLflow UI
mlflow uiMLflow sẽ chạy trên http://127.0.0.1:5000 (mặc định). Mở trình duyệt và truy cập vào địa chỉ đó.
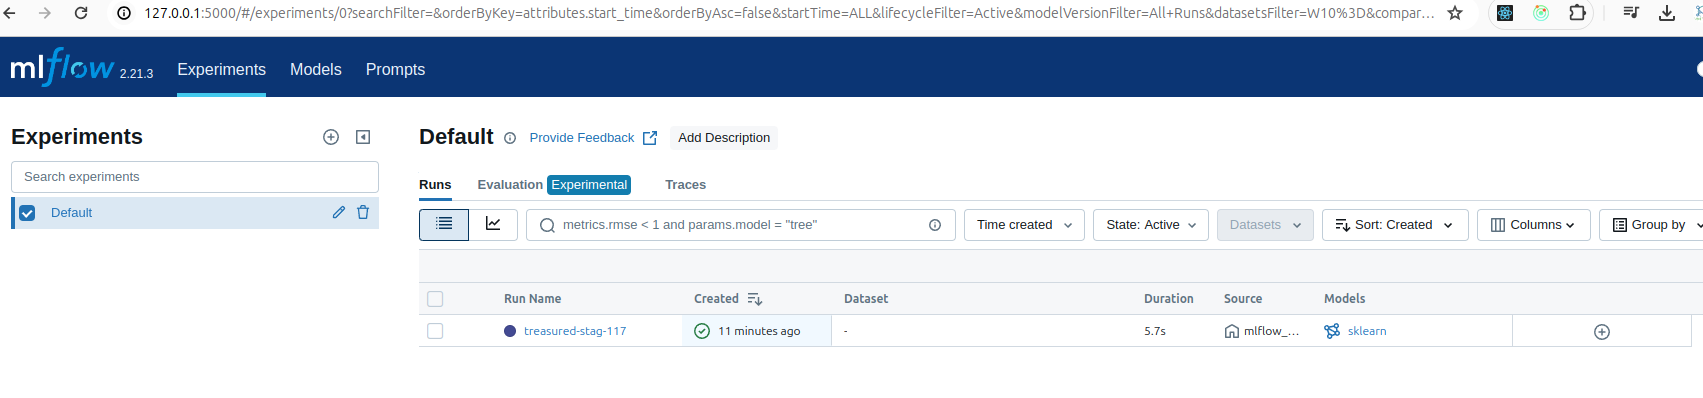
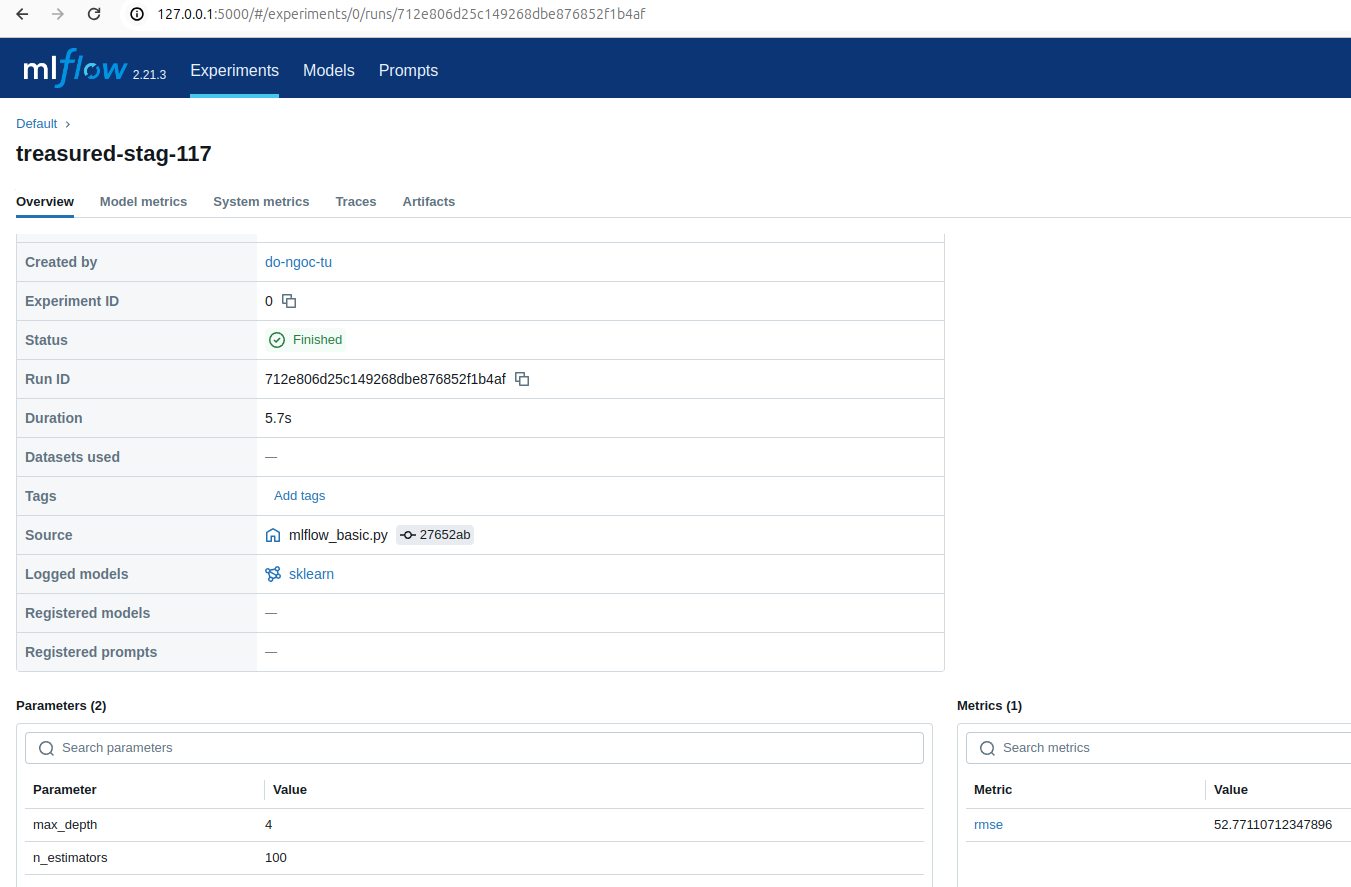
Click vào treasured-stag-117, bạn sẽ thấy
V. Tổng quan: "Log" trong MLflow nghĩa là gì?
Trong MLflow, "log" nghĩa là ghi lại và lưu trữ các thông tin như:
| Loại thông tin | Ví dụ | MLflow gọi là |
|---|---|---|
| Tham số (số lớp, số cây, learning rate, v.v.) | n_estimators=100 |
log_param |
| Kết quả đánh giá mô hình | rmse=54.772 |
log_metric |
| Mô hình đã huấn luyện | file .pkl hoặc .joblib |
log_model |
Ở ví dụ trên dùng RandomForestRegressor, mình sẽ ghi lại:
1. Tham số (Parameters)
mlflow.log_param("n_estimators", n_estimators)
mlflow.log_param("max_depth", max_depth)
Ghi lại cấu hình mô hình để sau này dễ tái hiện.
2. Metric (hiệu suất mô hình)
rmse = mean_squared_error(y_test, predictions, squared=False)
mlflow.log_metric("rmse", rmse)
Ghi lại giá trị RMSE để so sánh nhiều mô hình với nhau.
3. Ghi lại mô hình đã huấn luyện
mlflow.sklearn.log_model(model, "model")MLflow sẽ lưu mô hình để sau này có thể load lại, dùng để deploy, hoặc tái huấn luyện.
Tất cả đặt trong 1 "Run"
MLflow cần phải có 1 "chạy thử nghiệm" (run) để lưu trữ thông tin:
with mlflow.start_run():
    # log_param()
    # log_metric()
    # log_model()
Tóm tắt chúng ta đã học
| Bạn muốn... | Dùng hàm... |
|---|---|
| Ghi lại một tham số | mlflow.log_param(name, value) |
| Ghi lại một kết quả đánh giá | mlflow.log_metric(name, value) |
| Ghi lại mô hình đã huấn luyện | mlflow.sklearn.log_model(model, "model") |
| Bắt đầu một "chạy thử nghiệm" | with mlflow.start_run(): |
Tác giả: Đỗ Ngọc Tú
Công Ty Phần Mềm VHTSoft
MLFlow nâng cao
High-level Architecture

Mối quan hệ giữa các thành phần
-
Training Pipeline tạo ra mô hình → đẩy vào Model Registry.
-
Deployment Pipeline lấy mô hình từ registry → triển khai trên AWS → cung cấp API inference.
-
Traffic Data cập nhật ground truth → dùng để cải thiện mô hình qua feedback loop.
Dưới đây là giải thích chi tiết từng thành phần trong kiến trúc bạn cung cấp, được chia theo 3 pipeline chính:
1. Training Pipeline (Quy trình huấn luyện mô hình)
Dataset
-
Ý nghĩa: Tập dữ liệu đầu vào để huấn luyện mô hình AI/ML.
-
Chi tiết:
-
Có thể bao gồm dữ liệu lịch sử giao thông (ví dụ: hình ảnh camera, cảm biến, dữ liệu GPS).
-
Thường được chia thành train/validation/test sets.
-
Data processing
-
Ý nghĩa: Giai đoạn tiền xử lý dữ liệu thô.
-
Chi tiết:
-
Làm sạch dữ liệu: Loại bỏ nhiễu, giá trị thiếu, dữ liệu trùng lặp.
-
Chuẩn hóa: Đưa dữ liệu về cùng định dạng (ví dụ: resize ảnh, scaling số liệu).
-
Feature engineering: Tạo đặc trưng mới (ví dụ: thời gian cao điểm, thời tiết).
-
Training
-
Ý nghĩa: Huấn luyện mô hình học máy từ dữ liệu đã xử lý.
-
Chi tiết:
-
Sử dụng các thuật toán như Neural Networks, Random Forest, SVM...
-
Mục tiêu: Học các patterns từ dữ liệu giao thông (ví dụ: dự đoán ùn tắc).
-
Evaluation
-
Ý nghĩa: Đánh giá hiệu suất mô hình.
-
Chi tiết:
-
Dùng metrics như Accuracy, Precision, Recall, F1-score (với bài toán phân loại) hoặc MAE, RMSE (với bài toán hồi quy).
-
Kiểm tra overfitting/underfitting bằng validation set.
-
Registration
-
Ý nghĩa: Lưu trữ mô hình đã huấn luyện vào kho quản lý.
-
Chi tiết:
-
Model Registry (ví dụ: MLflow, AWS SageMaker Model Registry) giúp versioning, tracking.
-
Cho phép triển khai lại mô hình cũ nếu mô hình mới hoạt động kém.
-
2. Deployment Pipeline (Quy trình triển khai mô hình)
Data capturing
-
Ý nghĩa: Thu thập dữ liệu mới từ hệ thống thực tế.
-
Chi tiết:
-
Ví dụ: Ảnh từ camera giao thông, dữ liệu cảm biến IoT.
-
Có thể sử dụng Kafka hoặc AWS Kinesis để xử lý real-time.
-
Inference endpoint
-
Ý nghĩa: Điểm kết nối để gọi mô hình dự đoán.
-
Chi tiết:
-
Triển khai dưới dạng API (REST/gRPC) hoặc serverless function (AWS Lambda).
-
Nhận input (ví dụ: ảnh giao thông) → trả kết quả (ví dụ: mức độ ùn tắc).
-
AWS
-
Ý nghĩa: Nền tảng cloud để triển khai hệ thống.
-
Chi tiết:
-
SageMaker: Huấn luyện và triển khai mô hình.
-
EC2/Lambda: Chạy inference.
-
S3: Lưu trữ dữ liệu.
-
Model
-
Ý nghĩa: Mô hình đã được huấn luyện sẵn sàng triển khai.
-
Chi tiết:
-
Được lấy từ Model Registry trong Training Pipeline.
-
Đóng gói thành container (Docker) để deploy.
-
Model Registry
-
Ý nghĩa: Kho lưu trữ các phiên bản mô hình.
-
Chi tiết:
-
Theo dõi metadata: Hiệu suất, ngày huấn luyện, người tạo.
-
Hỗ trợ rollback nếu cần.
-
3. Traffic Data (Dữ liệu giao thông)
Ground truth
-
Ý nghĩa: Dữ liệu thực tế được gán nhãn chính xác.
-
Chi tiết:
-
Ví dụ: Ảnh giao thông được cảnh sát gán nhãn "kẹt xe" hoặc "thông thoáng".
-
Dùng để so sánh với kết quả dự đoán của mô hình.
-
Traffic data and labels
-
Ý nghĩa: Dữ liệu thô + nhãn tương ứng.
-
Chi tiết:
-
Dữ liệu: Lưu lượng xe, tốc độ di chuyển, thời gian.
-
Nhãn: Mức độ ùn tắc (0-10), loại sự cố (tai nạn, đường hư hỏng).
-
Testing
-
Ý nghĩa: Kiểm thử mô hình trên dữ liệu mới.
-
Chi tiết:
-
A/B testing: So sánh mô hình cũ vs mới.
-
Canary deployment: Triển khai thử nghiệm trên một phần hệ thống.
-
Reports & Metrics and reports
-
Ý nghĩa: Đo lường hiệu quả và báo cáo.
-
Chi tiết:
-
Metrics: Precision/Recall của mô hình, độ trễ inference.
-
Reports: Xuất file PDF/CSV hoặc dashboard (Power BI, Grafana).
-
Tác giả: Đỗ Ngọc Tú
Công Ty Phần Mềm VHTSoft
Cài đặt môi trường
Đảm bảo trên máy đã cài Python 3.12 hoặc cao hơn
python3 -m venv .venv
source .venv/bin/activate
pip3 install -U pip && pip3 install -r requirements.txtfile requirements.txt download tại https://github.com/vhtsoft/machine-learning.git
Tại thời điểm này, bạn sẽ có một môi trường Python đang hoạt động với tất cả các phụ thuộc cần thiết. Bước cuối cùng là tạo một tệp .env bên trong thư mục gốc của kho lưu trữ. Chúng ta sẽ sử dụng tệp này để xác định các biến môi trường cần thiết để chạy các pipeline
echo "KERAS_BACKEND=jax" >> .envChạy MLflow
mlflow server --host 127.0.0.1 --port 5000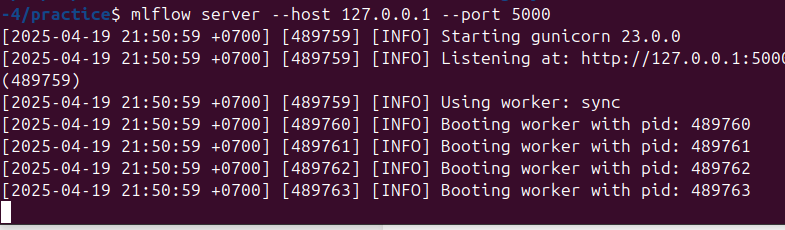
Tại Browser
http://localhost:5000/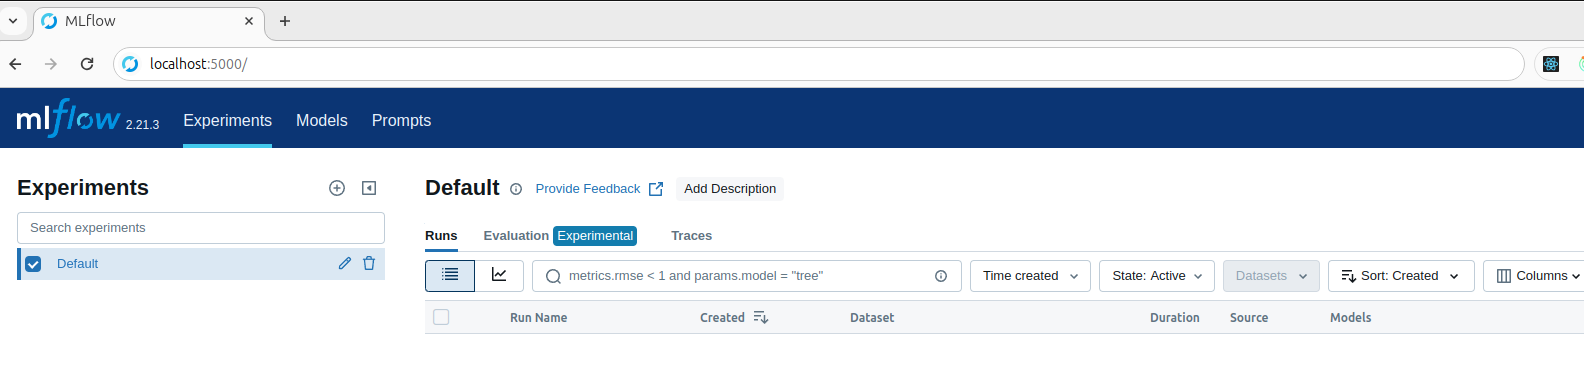
Theo mặc định, MLflow theo dõi các thử nghiệm và lưu trữ dữ liệu trong các tệp bên trong thư mục ./mlruns cục bộ. Bạn có thể thay đổi vị trí của thư mục theo dõi hoặc sử dụng cơ sở dữ liệu SQLite bằng tham số --backend-store-uri. Ví dụ sau sử dụng cơ sở dữ liệu SQLite để lưu trữ dữ liệu theo dõi:
mlflow server --host 127.0.0.1 --port 5000 --backend-store-uri sqlite:///mlflow.dbĐể biết thêm thông tin, hãy kiểm tra một số cách phổ biến để thiết lập MLflow. Bạn cũng có thể chạy lệnh sau để biết thêm thông tin về máy chủ:
mlflow server --helpSau khi máy chủ chạy, hãy sửa đổi tệp .env bên trong thư mục gốc của kho lưu trữ để thêm biến môi trường MLFLOW_TRACKING_URI trỏ đến URI theo dõi của máy chủ MLflow. Lệnh sau sẽ thêm biến vào tệp và xuất nó trong shell hiện tại của bạn:
export $((echo "MLFLOW_TRACKING_URI=http://127.0.0.1:5000" >> .env; cat .env) | xargs)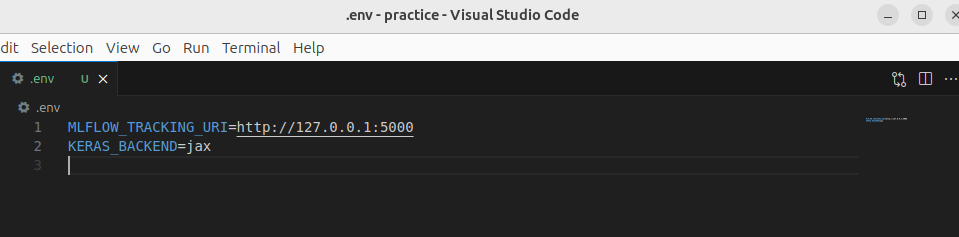
Tác giả: Đỗ Ngọc Tú
Công Ty Phần Mềm VHTSoft
Tổng Quan Qui Trình Pipeline Huấn Luyện Mô Hình
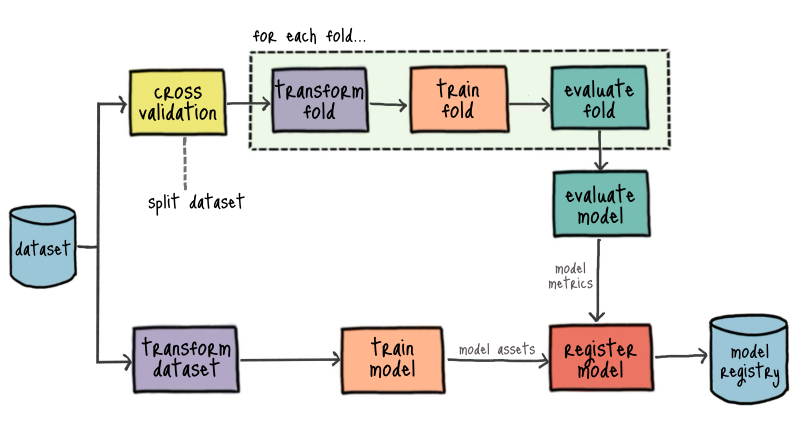
Đây là một quy trình (pipeline) huấn luyện mô hình học máy theo phương pháp Cross-Validation (kiểm tra chéo), thường được sử dụng để đánh giá hiệu suất mô hình một cách ổn định. Dưới đây là giải thích chi tiết từng bước:
1. Tổng quan
Pipeline này mô tả quy trình K-Fold Cross-Validation, trong đó:
-
Tập dữ liệu (dataset) được chia thành K phần (folds) bằng nhau.
-
Mô hình được huấn luyện K lần, mỗi lần sử dụng K-1 folds để train và 1 fold còn lại để validation.
-
Mục tiêu: Đảm bảo mô hình không bị overfitting và đánh giá khách quan trên toàn bộ dữ liệu.
2. Giải thích từng thành phần
a. Split dataset
-
Ý nghĩa: Chia tập dữ liệu thành K folds (phần).
-
Chi tiết:
-
Ví dụ: Với K=5, dữ liệu được chia thành 5 phần, mỗi phần chứa 20% dữ liệu.
-
Có thể chia ngẫu nhiên hoặc theo tỷ lệ lớp (stratified splitting) cho bài toán phân loại.
-
b. For each fold...
-
Ý nghĩa: Lặp lại quy trình train/validation trên từng fold.
-
Chi tiết:
-
Mỗi vòng lặp chọn 1 fold làm validation set, K-1 folds còn lại làm training set.
-
Ví dụ: Lần 1: Fold 1 là validation, Folds 2-5 là train; Lần 2: Fold 2 là validation, Folds 1,3-5 là train...
-
c. Transform dataset
-
Ý nghĩa: Tiền xử lý dữ liệu trước khi huấn luyện.
-
Chi tiết:
-
Chuẩn hóa dữ liệu (scaling, normalization).
-
Xử lý giá trị thiếu (imputation), mã hóa categorical features.
-
Lưu ý: Quy trình transform phải được áp dụng riêng cho train/validation để tránh data leakage.
-
d. Train model
-
Ý nghĩa: Huấn luyện mô hình trên tập train.
-
Chi tiết:
-
Sử dụng thuật toán như Random Forest, SVM, Neural Network...
-
Có thể tinh chỉnh hyperparameter (nếu dùng kết hợp với GridSearch/RandomSearch).
-
e. Evaluate model
-
Ý nghĩa: Đánh giá mô hình trên tập validation.
-
Chi tiết:
-
Tính các metrics: Accuracy, Precision, Recall (bài toán phân loại) hoặc MAE, RMSE (bài toán hồi quy).
-
Lưu lại kết quả để tổng hợp sau K lần chạy.
-
f. Model assets
-
Ý nghĩa: Các tài nguyên liên quan đến mô hình sau huấn luyện.
-
Chi tiết:
-
File trọng số (weights), kiến trúc mô hình (architecture), logs.
-
Metadata: Hyperparameters, thời gian huấn luyện.
-
g. Register model
-
Ý nghĩa: Lưu trữ mô hình vào Model Registry.
-
Chi tiết:
-
Dùng công cụ như MLflow, AWS SageMaker Model Registry.
-
Quản lý versioning (phiên bản), đánh dấu mô hình tốt nhất.
-
h. Model registry
-
Ý nghĩa: Kho lưu trữ tập trung các mô hình đã huấn luyện.
-
Chi tiết:
-
Cho phép triển khai (deploy) mô hình từ registry lên production.
-
Hỗ trợ rollback nếu mô hình mới có vấn đề.
-
3. Luồng hoạt động của pipeline
-
Chia dữ liệu → K folds.
-
Với mỗi fold:
-
Transform dữ liệu train/validation.
-
Train mô hình trên train set.
-
Evaluate trên validation set.
-
-
Tổng hợp kết quả từ K lần evaluate để tính độ ổn định của mô hình (ví dụ: mean accuracy ± độ lệch chuẩn).
-
Lưu mô hình tốt nhất vào Model Registry để triển khai.
4. Ứng dụng thực tế
-
Cross-Validation đặc biệt hữu ích khi:
-
Dữ liệu ít, cần tận dụng tối đa để đánh giá mô hình.
-
Tránh overfitting do chia ngẫu nhiên 1 lần (train-test split thông thường).
-
-
Ví dụ: Dự đoán lưu lượng giao thông dựa trên dữ liệu cảm biến, với K=5 để đảm bảo mô hình hoạt động tốt trên mọi khu vực.
Tác giả: Đỗ Ngọc Tú
Công Ty Phần Mềm VHTSoft
Xây Dựng Hàm Phụ Trợ PipeLine
Trong bài này sử dụng tập dữ liệu Penguins để đào tạo một mô hình phân loại các loài chim cánh cụt.
I. DatasetMixin Class
tại thư mục gốc tạo pipelines/common.py
import logging
import logging.config
import sys
import time
from io import StringIO
from pathlib import Path

import pandas as pd
from metaflow import IncludeFile, current

PYTHON = "3.12.8"

PACKAGES = {
    "keras": "3.8.0",
    "scikit-learn": "1.6.1",
    "mlflow": "2.20.2",
    "tensorflow": "2.18.0",
}


class DatasetMixin:
    """A mixin for loading and preparing a dataset.

    This mixin is designed to be combined with any pipeline that requires accessing
    a dataset.
    """

    dataset = IncludeFile(
        "dataset",
        is_text=True,
        help="Dataset that will be used to train the model.",
        default="data/penguins.csv",
    )

    def load_dataset(self):
        """Load and prepare the dataset."""
        import numpy as np

        # The raw data is passed as a string, so we need to convert it into a DataFrame.
        data = pd.read_csv(StringIO(self.dataset))

        # Replace extraneous values in the sex column with NaN. We can handle missing
        # values later in the pipeline.
        data["sex"] = data["sex"].replace(".", np.nan)

        # We want to shuffle the dataset. For reproducibility, we can fix the seed value
        # when running in development mode. When running in production mode, we can use
        # the current time as the seed to ensure a different shuffle each time the
        # pipeline is executed.
        seed = int(time.time() * 1000) if current.is_production else 42
        generator = np.random.default_rng(seed=seed)
        data = data.sample(frac=1, random_state=generator)

        logging.info("Loaded dataset with %d samples", len(data))

        return data


def packages(*names: str):
    """Return a dictionary of the specified packages and their corresponding version.

    This function is useful to set up the different pipelines while keeping the
    package versions consistent and centralized in a single location.

    Any packages that should be locked to a specific version will be part of the
    `PACKAGES` dictionary. If a package is not present in the dictionary, it will be
    installed using the latest version available.
    """
    return {name: PACKAGES.get(name, "") for name in names}


def configure_logging():
    """Configure logging handlers and return a logger instance."""
    if Path("logging.conf").exists():
        logging.config.fileConfig("logging.conf")
    else:
        logging.basicConfig(
            format="%(asctime)s [%(levelname)s] %(message)s",
            handlers=[logging.StreamHandler(sys.stdout)],
            level=logging.INFO,
        )


def build_features_transformer():
    """Build a Scikit-Learn transformer to preprocess the feature columns."""
    from sklearn.compose import ColumnTransformer, make_column_selector
    from sklearn.impute import SimpleImputer
    from sklearn.pipeline import make_pipeline
    from sklearn.preprocessing import OneHotEncoder, StandardScaler

    numeric_transformer = make_pipeline(
        SimpleImputer(strategy="mean"),
        StandardScaler(),
    )

    categorical_transformer = make_pipeline(
        SimpleImputer(strategy="most_frequent"),
        # We can use the `handle_unknown="ignore"` parameter to ignore unseen categories
        # during inference. When encoding an unknown category, the transformer will
        # return an all-zero vector.
        OneHotEncoder(handle_unknown="ignore"),
    )

    return ColumnTransformer(
        transformers=[
            (
                "numeric",
                numeric_transformer,
                # We'll apply the numeric transformer to all columns that are not
                # categorical (object).
                make_column_selector(dtype_exclude="object"),
            ),
            (
                "categorical",
                categorical_transformer,
                # We want to make sure we ignore the target column which is also a
                # categorical column. To accomplish this, we can specify the column
                # names we only want to encode.
                ["island", "sex"],
            ),
        ],
    )


def build_target_transformer():
    """Build a Scikit-Learn transformer to preprocess the target column."""
    from sklearn.compose import ColumnTransformer
    from sklearn.preprocessing import OrdinalEncoder

    return ColumnTransformer(
        transformers=[("species", OrdinalEncoder(), ["species"])],
    )


def build_model(input_shape, learning_rate=0.01):
    """Build and compile the neural network to predict the species of a penguin."""
    from keras import Input, layers, models, optimizers

    model = models.Sequential(
        [
            Input(shape=(input_shape,)),
            layers.Dense(10, activation="relu"),
            layers.Dense(8, activation="relu"),
            layers.Dense(3, activation="softmax"),
        ],
    )

    model.compile(
        optimizer=optimizers.SGD(learning_rate=learning_rate),
        loss="sparse_categorical_crossentropy",
        metrics=["accuracy"],
    )

    return model
Class DatasetMixin
Là một mixin — class phụ dùng để thêm khả năng load_dataset() vào các pipeline Metaflow.
dataset = IncludeFile(
    "dataset",
    is_text=True,
    help="Dataset that will be used to train the model.",
    default="data/penguins.csv",
)
-
Cho phép bạn đưa một file vào flow như biến
self.dataset. -
Dữ liệu được load dưới dạng text, bạn sẽ cần dùng
StringIOđể convert sang CSV.
load_dataset()
def load_dataset(self):
    ...
-
Đọc file CSV từ
self.dataset. -
Chuẩn hóa giá trị
., NaN trong cột"sex". -
Shuffle dữ liệu bằng
numpy:-
Dùng
seed=42nếu đang ở development. -
Dùng
seed = timenếu ở production (current.is_production).
-
Hàm packages(*names)
def packages(*names: str):
    return {name: PACKAGES.get(name, "") for name in names}
Khi bạn viết Metaflow @conda_base hoặc @conda decorator, bạn có thể truyền gọn:
@conda(packages=packages("keras", "scikit-learn"))Hàm configure_logging()
def configure_logging():
...-
Nếu có file
logging.confthì dùng cấu hình từ file. -
Nếu không có thì thiết lập mặc định:
-
Format log cơ bản
-
In log ra terminal (stdout)
-
Mức
INFO
-
build_features_transformer()
def build_features_transformer():
    ...
Trả về một ColumnTransformer để xử lý:
-
Các cột số (
int,float):-
Impute bằng trung bình (
SimpleImputer(strategy="mean")) -
Chuẩn hóa (
StandardScaler())
-
-
Các cột phân loại (
object):-
Impute bằng mode (
most_frequent) -
One-hot encode (
OneHotEncoder(handle_unknown="ignore"))
-
["island", "sex"] # là các cột categorical cụ thểhandle_unknown="ignore" giúp model không crash khi gặp category mới trong inference.
build_target_transformer()
def build_target_transformer():
...-
Dùng
OrdinalEncoderđể mã hóa target"species"thành số nguyên (0, 1, 2). -
Gói trong
ColumnTransformerđể có API nhất quán vớifit_transform,inverse_transform.
build_model(input_shape, learning_rate)
def build_model(input_shape, learning_rate=0.01):
...-
Xây dựng model với Keras Sequential API:
-
Input:
input_shapechiều (sau preprocessing) -
2 hidden layers: 10 và 8 neurons
-
Output: 3 class (penguin species) → softmax
-
-
Compile model:
-
Optimizer:
SGDvới learning rate -
Loss:
sparse_categorical_crossentropy -
Metrics:
accuracy
-
Tổng Kết
| Phần | Mục đích |
|---|---|
DatasetMixin |
Load CSV dataset dùng IncludeFile, shuffle, xử lý giá trị thiếu |
packages() |
Tập trung quản lý version package |
configure_logging() |
Ghi log ra terminal hoặc file |
build_features_transformer() |
Chuẩn hóa, encode dữ liệu đầu vào |
build_target_transformer() |
Encode target sang số |
build_model() |
Khởi tạo mô hình MLP với Keras |
Tác giả: Đỗ Ngọc Tú
Công Ty Phần Mềm VHTSoft
Bắt đầu với Pipeline
 @card
    @step
    def start(self):
        """Start and prepare the Training pipeline."""
        import mlflow

        mlflow.set_tracking_uri(self.mlflow_tracking_uri)
        logging.info("MLflow tracking server: %s", self.mlflow_tracking_uri)

        self.mode = "production" if current.is_production else "development"
        logging.info("Running flow in %s mode.", self.mode)

        self.data = self.load_dataset()

        try:
            # Let's start a new MLflow run to track the execution of this flow. We want
            # to set the name of the MLflow run to the Metaflow run ID so we can easily
            # recognize how they relate to each other.
            run = mlflow.start_run(run_name=current.run_id)
            self.mlflow_run_id = run.info.run_id
        except Exception as e:
            message = f"Failed to connect to MLflow server {self.mlflow_tracking_uri}."
            raise RuntimeError(message) from e

        # Now that everything is set up, we want to run a cross-validation process
        # to evaluate the model and train a final model on the entire dataset. Since
        # these two steps are independent, we can run them in parallel.
        self.next(self.cross_validation, self.transform)
1. Decorators
@card
@step
def start(self):-
@step:
Đánh dấu đây là một bước (step) trong Metaflow pipeline. Mỗi step sẽ được thực thi tuần tự hoặc song song tùy vào luồng thiết kế. -
@card:
Tạo một báo cáo trực quan (report) trong giao diện UI của Metaflow, giúp theo dõi thông tin chi tiết của step này (ví dụ: logs, artifacts).
2. Khởi tạo MLflow Tracking
import mlflow
mlflow.set_tracking_uri(self.mlflow_tracking_uri)
logging.info("MLflow tracking server: %s", self.mlflow_tracking_uri)-
mlflow.set_tracking_uri():
Thiết lập địa chỉ của MLflow Tracking Server (nơi lưu trữ logs, metrics, models).-
Giá trị được lấy từ tham số
mlflow_tracking_uri(mặc định làhttp://127.0.0.1:5000hoặc biến môi trườngMLFLOW_TRACKING_URI). -
Ví dụ: Nếu dùng MLflow trên AWS, URI có thể là
http://<ip>:5000.
-
-
logging.info():
Ghi log thông tin để kiểm tra địa chỉ MLflow server đã được thiết lập.
3. Xác định chế độ chạy
self.mode = "production" if current.is_production else "development"
logging.info("Running flow in %s mode.", self.mode)-
current.is_production:
Kiểm tra xem pipeline đang chạy ở chế độ production hay development (dựa trên cách khởi chạy Metaflow).-
Production: Chạy với
--productionflag (ví dụ:python training.py --production). -
Development: Chạy mặc định.
-
-
Ứng dụng:
Có thể điều chỉnh hành vi pipeline tùy theo chế độ (ví dụ: dùng dataset khác nhau).
4. Tải dữ liệu
self.data = self.load_dataset()
-
load_dataset():
Phương thức kế thừa từDatasetMixin, dùng để tải dữ liệu huấn luyện.-
Dataset thường là file CSV/JSON hoặc từ database (ví dụ: bảng thông tin chim cánh cụt với các cột như
bill_length,flipper_length,species).
-
def load_dataset(self):
    return pd.read_csv("penguins.csv")
5. Thiết lập MLflow Run
try:
    run = mlflow.start_run(run_name=current.run_id)
    self.mlflow_run_id = run.info.run_id
except Exception as e:
    message = f"Failed to connect to MLflow server {self.mlflow_tracking_uri}."
raise RuntimeError(message) from e-
mlflow.start_run():
Bắt đầu một MLflow Run để theo dõi thí nghiệm.-
run_name=current.run_id:
Đặt tên run bằng ID của Metaflow run (ví dụ:penguins-12345), giúp liên kết giữa Metaflow và MLflow. -
run.info.run_id:
Lưu ID của MLflow Run vàoself.mlflow_run_idđể sử dụng ở các step sau.
-
-
Xử lý lỗi:
Nếu kết nối đến MLflow Server thất bại (ví dụ: server chưa khởi động), sẽ raise exception với thông báo rõ ràng.
6. Chia nhánh pipeline
self.next(self.cross_validation, self.transform)-
self.next():
Chia luồng thành 2 nhánh song song:-
cross_validation: Đánh giá mô hình bằng K-Fold Cross-Validation. -
transform: Tiền xử lý toàn bộ dataset để huấn luyện mô hình cuối cùng.
-
-
Lý do song song:
Hai bước này độc lập, không phụ thuộc nhau → Tối ưu thời gian chạy.
Tóm tắt luồng xử lý
-
Thiết lập MLflow Tracking Server.
-
Xác định chế độ chạy (production/development).
-
Tải dữ liệu từ nguồn (CSV, database, API...).
-
Bắt đầu MLflow Run và liên kết với Metaflow Run.
-
Chia thành 2 nhánh song song: Cross-Validation và Transform.
Tác giả: Đỗ Ngọc Tú
Công Ty Phần Mềm VHTSoft